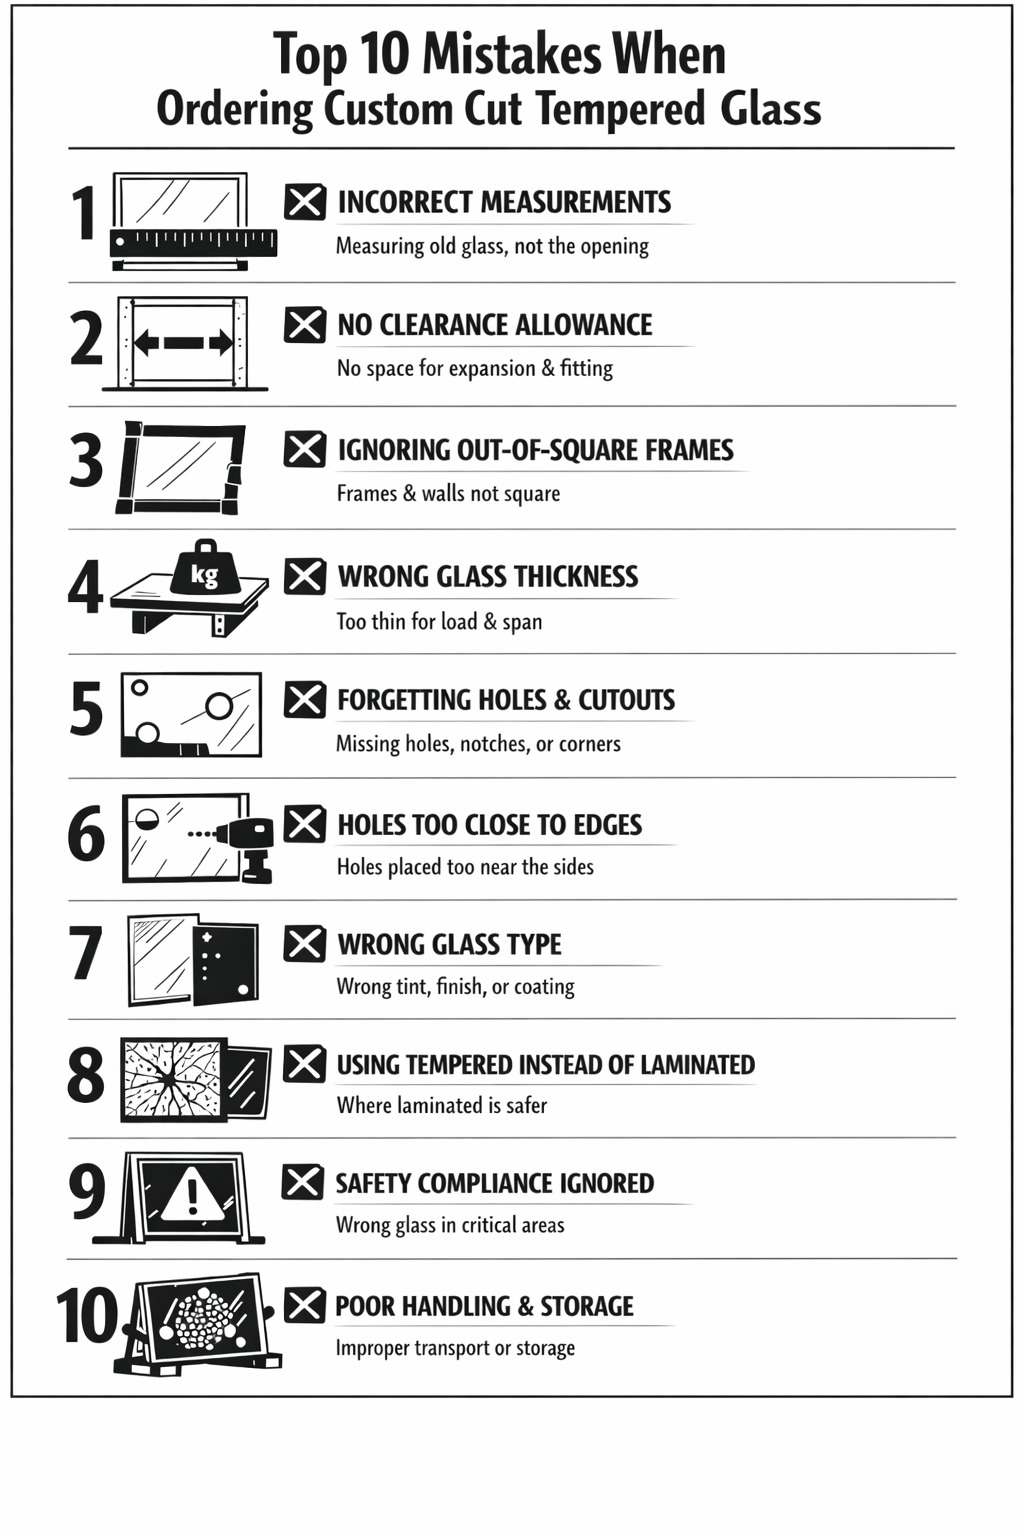
Ordering custom cut tempered glass sounds simple: choose a size, pick a thickness, place the order. In reality, most problems happen before the glass is ever made—because tempered glass has strict manufacturing limits, and small misunderstandings can lead to expensive remakes.
Tempered (toughened) glass is heat-treated so it becomes significantly stronger than ordinary annealed glass and, crucially, breaks into small granular pieces rather than long sharp shards—one reason it’s widely used in “critical locations” where people might impact glass.
Below are the 10 most common mistakes customers make when ordering custom cut tempered glass and practical, real-world fixes.
Mistake #1: Measuring “glass size” instead of the actual opening (and forgetting clearance)
What happens: People measure the old glass (or guess from the frame’s outside size) and order the same dimensions—then the new pane won’t fit because the rebate/channel is smaller, the frame isn’t square, or there’s no clearance for glazing packers and expansion.
How to avoid it:
- Measure the tight opening where the glass must sit (inside the frame/channel).
- Measure in at least 3 places (top/middle/bottom for width, left/centre/right for height).
- Use the smallest measurement as your base.
- Subtract a sensible clearance (often a few millimetres) so the glass can seat properly without binding.
Pro tip: If it’s for a door, partition, or area where impact safety matters, make sure the final installed glass still meets the relevant safety glazing requirement for that location (see Mistake #9).
Mistake #2: Ignoring squareness, level, and bow in real structures
Walls and frames are rarely perfectly square—especially in older homes, garden rooms, extensions, and DIY-built cabinetry. A “perfect rectangle” glass sheet can end up with a corner that clashes, a visible wedge gap, or stress points when forced into place.
How to avoid it:
- Check diagonals (corner-to-corner). If diagonal measurements don’t match, the opening isn’t square.
- If the difference is meaningful, consider:
- Ordering a tapered piece (different widths at top and bottom), or
- Using trims/gaskets to hide small variation without forcing the glass.
- Ordering a tapered piece (different widths at top and bottom), or
Mistake #3: Choosing thickness based on “what looks right,” not load and span
A common failure is ordering glass that’s too thin for a shelf, tabletop, or supported span. It may look fine but flex more than expected, feel unsafe, or crack during installation.
How to avoid it:
- Decide based on:
- Span (unsupported distance)
- Load (expected weight)
- Support type (edge supported, point supported, brackets, clamps)
- Use case (shelf vs table vs balustrade vs splashback)
- Span (unsupported distance)
- When in doubt, move up a thickness and/or reduce span with additional supports.
Important reality check: Tempering increases strength, but it doesn’t make glass “unbreakable,” and it doesn’t stop excessive deflection if the design is wrong. Standards around glazing safety and impact are built around tested performance classifications, not guesswork.
Mistake #4: Not specifying the correct edgework (rarised, polished, bevelled) for the application
Edges are where most “this doesn’t look premium” complaints come from. People order a nice piece, then realize the edges are too sharp, too rough, or visually unfinished for a visible installation.
How to avoid it:
- For exposed edges (shelves, tabletops, partitions): request polished edges.
- For hidden edges in a frame/channel: a simpler edge finish may be fine.
- For safety and handling: consider at least arrised/seamed edges if the glass will be handled during install.
Why it matters: Toughened glass standards focus on characteristics like tolerances, edgework, fragmentation, and performance requirements for thermally toughened glass.
Mistake #5: Forgetting that tempered glass cannot be cut, drilled, or notched after tempering
This is the classic (and costly) error.
What happens: A customer orders a simple rectangle, then later decides they need:
- A cable hole
- A cut-out for a socket
- A notch around a bracket
- A radius corner
After tempering, any attempt to modify the glass usually causes it to shatter.
How to avoid it:
- Finalize all holes, cut-outs, notches, corner radii, and shape details before ordering.
- Provide a clear drawing with:
- Overall size
- Hole diameter
- Hole centre positions from two reference edges
- Any notches/cut-outs with dimensions
- Overall size
Mistake #6: Placing holes and notches too close to edges or corners
Even if you remember to request holes, their position matters. Holes too close to edges or corners can create stress concentrations—raising the risk of breakage either during tempering, handling, or installation.
How to avoid it:
- Use conservative spacing:
- Keep holes away from edges and corners whenever possible.
- Avoid aligning holes directly with corners or tight internal cut-out corners.
- Keep holes away from edges and corners whenever possible.
- If you’re using clamps/spigots or hardware systems, follow the hardware manufacturer’s templates.
Mistake #7: Not stating the correct glass type/finish (clear vs low-iron, privacy, coatings, frosting method)
People often say “clear glass” but actually want:
- Low-iron (clearer, less green tint)
- Frosted/acid-etched for privacy
- A specific tint
- A coating that affects reflectivity or heat performance
Then the delivered glass looks “wrong” even though it matches the vague order.
How to avoid it:
- Be specific about:
- Glass type (standard clear vs low-iron)
- Finish (frosted, sandblasted, acid-etched)
- Which side is treated (for frosted/etched)
- Any aesthetic priority (true clarity, privacy level, glare control)
- Glass type (standard clear vs low-iron)
Mistake #8: Using tempered glass where laminated safety glass is actually the safer choice
Tempered glass breaks “safely,” but it still breaks into many small pieces and can fall out of an opening when it fails. In some applications—especially overhead, guarding, or where retention matters—laminated glass (often laminated toughened) may be more appropriate because the interlayer can help hold fragments together.
How to avoid it:
- Ask yourself: “If this breaks, do I need it to stay in place?”
- If yes, consider laminated options (or laminated toughened) depending on the scenario.
- If yes, consider laminated options (or laminated toughened) depending on the scenario.
- For impact safety, performance is often discussed in terms of tested classifications (like EN 12600 impact classes).
Mistake #9: Not checking compliance requirements for “critical locations” (doors, side panels, low glazing)
In the UK, safety glazing requirements apply to specific “critical locations,” especially in and around doors and where glazing is likely to be impacted. Guidance is set out in documents like Approved Document K (Protection from falling, collision and impact).
What happens: Someone orders non-compliant glass (or the wrong safety spec), then a builder, inspector, or installer refuses to fit it—or worse, it gets fitted and becomes a liability.
How to avoid it:
- If the glass is for:
- Doors and door side panels
- Low-level glazing
- Partitions where people may collide
- Doors and door side panels
- Confirm it meets safety glazing expectations, typically via appropriate safety glass type and tested impact classification (EN 12600 is widely referenced for impact performance classification).
- For broader glazing safety guidance related to human impact, UK industry references include BS 6262-4.
Mistake #10: Underestimating delivery, handling, storage, and installation risk
A large percentage of breakages happen after manufacturing:
- Glass stored flat on an uneven floor
- Glass carried without edge protection
- Point pressure from a stone/screw on the ground
- Over-tightened clamps
- No packers, or packers in the wrong place
- Forcing glass into a tight frame (edge contact + twist)
How to avoid it:
- Store glass upright on a stable A-frame with padding (unless your supplier instructs otherwise).
- Keep edges protected—edges are the most vulnerable area.
- Use correct glazing packers and avoid direct glass-to-metal contact where it’s not designed.
- Don’t over-tighten hardware; follow fitting instructions.
- Never “make it fit” by pushing, twisting, or wedging—re-check dimensions instead.
A quick pre-order checklist (steal this)
Before you click “buy,” confirm you have:
- ✅ Final opening measurements (3-point check + clearance)
- ✅ Squareness/diagonal check (or a template if needed)
- ✅ Correct thickness for span/load/support
- ✅ Correct glass type/finish (clear/low-iron/frosted/tinted)
- ✅ Edgework specified (polished/arrised/etc.)
- ✅ All holes/cut-outs/notches included with dimensions
- ✅ Hole positions safely spaced from edges/corners
- ✅ Safety compliance checked for the location (e.g., doors/low glazing)
- ✅ Installation plan (packers, clamps, handling, storage)
Final though
Most “wrong glass” situations aren’t manufacturing defects—they’re specification gaps. If you treat your order like a mini engineering brief (measure properly, specify details clearly, and match the glass to the real-world use case), custom cut tempered glass is one of the cleanest, strongest, and most professional-looking materials you can install.
Read More: Should You Replace an Old Boiler Before Winter Hits?